Replacement Windows are Unique in the way they are Measured and Installed
Among the many building blocks of my construction career are two specialties for which I trained extensively. The first was a period early on where I installed doors for a production builder. The second was where I became a dealer for Don Young Windows where I sold and installed residential replacement windows. I have seen thousands of both done properly and many more done incorrectly.
The devil is in the details, as they say. Have you ever seen a door that works perfectly some times then sticks during other times of the year? Does your door only latch to the striker plate when the temperature is right? Is one of your windows harder to open than the others? Do you feel air blow in around your windows? Each of these issues is caused by a different problem, but each occurs for a similar reason. The reason is process. My training for each application focused on the proper procedure with which to handle and install the manufactured component. Unlike carpentry where you can “doctor” the work to make it fit or function, the strict limitations within which a manufactured product can function properly requires a specific process for preparation and installation.
Never use Expanding Foam around Windows or Doors
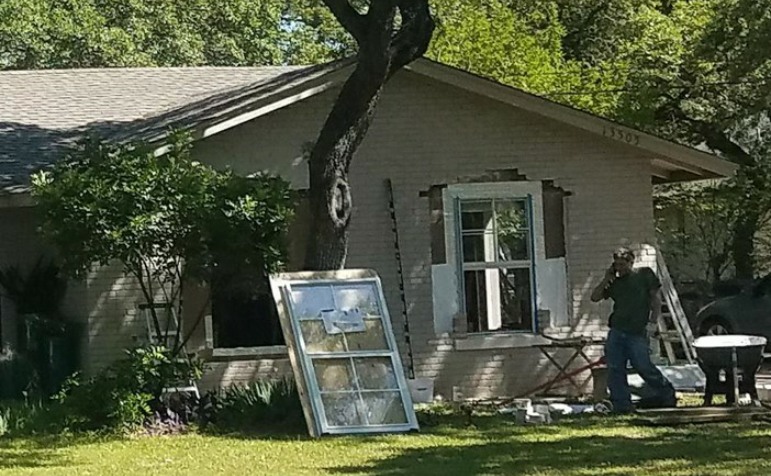
When hanging a door, one should never shim both sides of the jamb. Level the hinge side frame then shim for reveal not for swing. And, for goodness sake, never use expanding foam between the jamb and frame. Recently, manufacturers of this detestable product have labeled the can with a warning about making this error. Don’t be confused. We will cover hanging a door in a later blog. My motivation for this article hit me on my way home from work last week. An older brick home nearby was surrounded by several work trucks. Workers were industriously removing bricks from the front of the house. As I passed by the following evening, the mill finish aluminum windows were being removed and new flanged windows were leaned nearby, ready for installation. The third day found the new windows installed. Window tape and some sort of insulating foam surrounded the new windows in the ragged holes where bricks had once lain. The fourth day, I drove past as a mason lay concrete block in the hole in the ragged brick veneer between the window and the old brick. As you can see from the photo below, the blocks are poorly installed and unsightly. The owner would have been better off keeping the old windows rather than ruin his home.
Installing Replacement Windows in Brick or Stone
What I am about to share with you is probably the most controversial topic in home renovation today. I am going to address the topic of replacement window installation in masonry veneer homes.
Why do Window Replacement Contractors Install the way they Do?
 If you google it, your search will result in a myriad of different techniques to ensure that you install replacement windows with a focus upon blocking moisture, the elements, and prevent insects from entering your home and destroying your wood framing. The techniques you will see and hear about are very expensive Band-Aids, meant to save the installer and the company time and money on what has become one of the quickest and most profitable projects in the business.
I have been a window installer and am now a dealer for high-end replacement windows. That experience alone is not adequate to advise you on the best way to install replacement windows in your home. With the added weight of more than 40 years in all phases of new construction and home renovation, I can confidently say that if you purchased replacement windows for your brick, stone, or stucco home, they were installed improperly, and will not last the warranty.
If your windows were not installed from the inside of your home, behind the masonry veneer, they were not installed properly. Your windows will not stand up to the elements, nor will they provide the performance you paid dearly for. With the average replacement window installation running between $2500 and $3500 per window, you don’t want to face costly repairs in as few as five years.
In new construction, windows are attached to the framing of the home. They are not installed over sheetrock, trim or brick veneerWhy did the contractor install your windows inside the masonry perimeter rather than the way I recommend?
The simple answer is Trouble, Time, and Money.
Very few window replacement companies, nor their installers, have any competency in other phases of construction. They are in the window business precisely because it is quick and easy, and very profitable. Their sales pitch includes talk of lifetime warranties, energy savings, and sustainability. Their window specifications tout R and UV values, resistance to heat and air transference, and rigidity against wind and stress to the window frames.
Let me ask you a reasonable question: If you installed that window in a tent, how much good would it do? Would the window perform to a level that you would feel your money paid was well invested? It would perform as advertised but the installation would not. How long would that window last in that environment before you had to repair the installation?
That is a ridiculous comparison, you say. Is it? If your windows have been inserted into the perimeter of your masonry opening, the window is smaller than that opening, or it wouldn’t fit in the opening. When the window is inserted, how does the installer plug the spaces around the window? He uses some type of caulk. That means that your lifetime window will perform only as long as the caulk joint lasts, usually about five years.
But wait, you say, my installers built wooden frames inside the brick and fastened the windows to that. They used window tape, and they caulked over that. That means that in five years or so you will have a pervious point where the new wood will be exposed to the elements. That buys you more time before you feel air flow, or detect water penetration, but it is still not a lifetime installation for your lifetime warranteed windows.
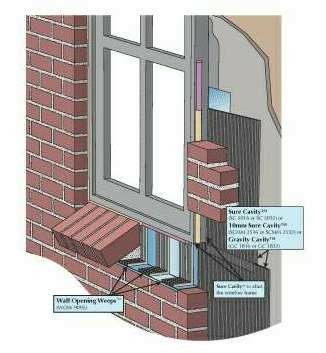
If you are an installer, or a homeowner who wants to deny that the installer messed up your expensive install, consider this. When a window is installed in a new home, the window is attached to the frame using nail fins, window tape, sill tape, and a sealant. The brick is installed against the window. Mortar is used to seal the joint where the window meets the masonry. A bead of a petroleum-based sealant is laid over the mortar to finish the seal. The frame of the window is larger than the brick opening, effectively sealing the window with the strength and weight of the window frame.
It’s sad to Professionals what a Well-Intentioned Owner Will do to his Home.